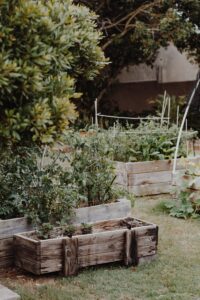
This article will show you the step-by-step process of creating your custom wooden planters. Whether you’re a seasoned DIY enthusiast or a beginner looking to try woodworking, we’ve got you covered. From choosing the perfect wood to assembling and finishing your planters, we’ll provide you with all the tips and tricks you need to create stunning, personalized planters that will beautifully complement any space. So, grab your tools, and let’s get started on this fun and rewarding project!
Choosing the Right Wood
Choosing the correct wood is an essential step when building custom wooden planters. Several considerations must be made to ensure that the wood used is suitable for outdoor use and will withstand the elements.
Considerations for Wood Selection
When selecting wood for your planters, consider its durability, resistance to decay and rot, and appearance. Opting for a wood species that naturally resists decay, such as cedar or redwood, is highly recommended. These woods have natural oils and resins that make them more resistant to moisture, insects, and decay. Additionally, they have a beautiful natural color and grain pattern that adds charm to any garden or patio space.
Another consideration is the wood’s sustainability. Choosing FSC-certified (Forest Stewardship Council) wood ensures that the wood is sourced from responsibly managed forests. This helps to protect the environment and ensures that the wood used in your planters comes from sustainable sources.
Common Types of Wood for Planters
Several common types of wood are popular choices for building planters. Here are three of the most commonly used ones:
- Cedar: Cedar is a popular choice for wooden planters due to its natural resistance to decay. It has a beautiful reddish-brown color that weathers to a stunning silver-gray over time. Cedar is lightweight, easy to work with, and has a pleasant aroma.
- Redwood: Redwood is another excellent choice for planters because of its natural resistance to decay, insects, and rot. It has a rich reddish color and a straight grain, making it visually appealing. Redwood is also known for its dimensional stability, which means it is less likely to shrink or warp.
- Teak: Teak is a tropical hardwood highly regarded for its durability and natural resistance to decay. It has a beautiful golden-brown color that weathers to a silver-gray patina over time if left untreated. Teak is often used in high-end outdoor furniture and is an excellent choice for planters that require extra durability.
Evaluating Wood Quality
When purchasing wood for your planters, it’s essential to evaluate the quality of the wood carefully. Look for straight boards without any noticeable warping or twisting. Check for any signs of rot, decay, or insect damage, as these can compromise the longevity of your planters. Additionally, inspect the wood for knots and cracks, as these can weaken the structure of the planter. By selecting high-quality wood, you can ensure your planters will be sturdy and long-lasting.
Measuring and Cutting the Wood
Once you have chosen the suitable wood for your planters, it’s time to measure and cut the wood to the desired size. This step is crucial to ensure that your planters fit your space perfectly.
Determining Planter Size
Before measuring and cutting the wood, it’s essential to determine the size of your planters. Consider the space where you plan to install the planters and decide on the dimensions accordingly. Please consider the types of plants you intend to grow and their growth habits to ensure that the planters are spacious enough for the plants to thrive.
Measuring and Marking the Wood
To ensure accuracy, mark the dimensions on the wood using a tape measure and a pencil. Measure twice to double-check your measurements before making any cuts. It is always better to be precise than to make mistakes that could lead to ill-fitting planters.
Cutting the Wood
Once you have marked the dimensions on the wood, you can proceed to cut it. Use a circular or miter saw to make your cuts, ensuring the blade is set to the appropriate depth. Take time and cut along the marked lines, applying steady pressure to achieve clean, straight cuts. Wear safety goggles and work in a well-ventilated area when using power tools.
Assembling the Planter Box
Now that you have cut the wood to the desired dimensions, it’s time to assemble the planter box. This involves joining the boards to create the planter’s bottom and sides.
Gathering Materials and Tools
Before assembling the planter box, gather all the necessary materials and tools. You will need wood screws or nails, a drill or hammer, a screwdriver or nail gun, and wood glue. Make sure you have everything within reach to ensure a smooth assembly process.
Creating the Bottom and Sides
To create the bottom of the planter, align the cut boards and use wood screws or nails to secure them together. Ensure the boards are flush, and use a square to ensure the corners are at right angles.
Next, attach the side boards to the bottom by applying wood glue along the edges and securing them with screws or nails. Repeat this process for each side, ensuring everything is aligned and tightly joined.
Attaching the Corners and Reinforcements
Add corner brackets or L-brackets at each corner to reinforce the corners and increase the structural integrity of the planter box. These brackets can be attached with screws or nails, further securing the corners and preventing the planter from coming apart over time.
You can also add support braces inside the planter box for extra reinforcement. These braces can be cut from additional wood and attached across the width or length of the planter, ensuring that they remain sturdy even when filled with soil and plants.
Applying Finishes and Treatments
Once the planter box is assembled, it’s time to apply finishes and treatments to protect the wood and enhance its appearance. Finishes help to seal the wood, preventing moisture from penetrating the surface and protecting it from UV rays, insects, and decay.
Importance of Finishes and Treatments
Applying finishes and treatments is crucial for the longevity of your wooden planters. Outdoor planters are exposed to harsh weather conditions and constant moisture from watering, leading to decay and rot if the wood is not adequately sealed. Finishing the wood provides an extra layer of protection, helping to extend the lifespan of your planters.
Choosing the Right Finish
Various finishes are available for wooden planters, including paints, stains, and clear sealants. The choice of finish depends on your personal preference and the desired look for your planters.
If you want a natural aesthetic, a clear sealant or wood preservative can enhance the wood’s natural color and protect it from the elements. Stains are popular as they provide a range of colors and allow the wood grain to show through. On the other hand, paintings offer unlimited color options and can add a pop of personality to your planters.
Choosing a finish specifically formulated for exterior use is essential, as it is resistant to moisture, UV rays, and fungal growth. This will ensure your planters remain protected and maintain their appearance for years.
Applying the Finish
Before applying any finish, ensure the wood is clean and dust-free. Sand the surface lightly with fine-grit sandpaper to smooth out any rough areas. Use a brush or roller to apply the finish evenly, following the manufacturer’s instructions for drying times and recoating. Apply multiple coats if necessary, allowing each coat to dry completely before adding the next. Once the finish is dry, your planters will be ready to withstand the outdoor elements.
Adding Drainage Holes and Liners
You must add drainage holes to your planters to ensure proper drainage and prevent waterlogged soil. Additionally, using liners can provide an extra layer of protection for the wood, prolonging its lifespan.
Importance of Drainage Holes
Drainage holes are crucial for the health of your plants. They allow excess water to escape, preventing waterlogging and root rot. The soil can become compacted without proper drainage, leading to poor plant growth and potential damage to the wooden planter.
Drilling the Drainage Holes
Using a drill with a drill bit suited for the size of the holes you desire, carefully drill drainage holes in the bottom of your planter. The number and size of the holes may vary depending on the size of your planter, the type of plants you are growing, and their water requirements. It’s best to research your plants’ specific needs to determine the appropriate hole size and spacing.
Ensure the holes are evenly spaced and positioned to allow for sufficient drainage. Test the drainage by pouring water into the planter and observing how quickly it drains. Adjust the hole size or number as needed to achieve optimal drainage.
Using Liners to Protect the Wood
Adding a liner to your wooden planter can provide additional protection against moisture and soil erosion. Liners can be made from landscape fabric, plastic, or rubber. They help to create a barrier between the wood and the soil, preventing direct contact and reducing the risk of rot.
When using a liner, ensure it extends to cover the bottom and sides of the planter. Trim any excess liner material and secure it in place using staples or adhesive. This will help keep the liner in place and ensure it does not interfere with the drainage holes.
Adding Feet or Casters
Adding feet or casters to your wooden planters can provide several benefits, making them easier to move, protecting the wood from direct contact with the ground, and improving airflow and drainage.
Benefits of Adding Feet or Casters
By adding feet or casters to your planters, you can elevate them off the ground, allowing for better airflow underneath. This helps prevent the wood from rotting due to prolonged exposure to moisture. Lifting the planter off the ground prevents it from sitting directly on surfaces that may cause water damage, such as decks or concrete.
Feet or casters also make it easier to move the planters around, especially if you need to rearrange your outdoor space or bring the planters indoors during colder months. They provide mobility and convenience, allowing you to transport your plants as needed quickly.
Choosing the Right Feet or Casters
When selecting feet or casters for your planters, consider the planter’s weight and ensure that the chosen option can support the load. Look for durable and weather-resistant materials that will withstand the outdoor elements. Rubber or plastic feet are ideal for preventing scratches on delicate surfaces, while heavy-duty casters with locking mechanisms provide stability when the planter is in use.
Attaching Feet or Casters
To attach feet or casters to your wooden planters, choose the position where you want them installed. If using feet, screw them into place at each corner of the planter’s bottom. Make sure they are securely attached and provide enough clearance to elevate the planter off the ground.
For casters, mark the position of each caster on the bottom of the planter and drill pilot holes for the caster screws. Attach the casters by aligning them with the pilot holes and using screws or bolts to secure them into place. Once attached, test the mobility and stability of the planters to ensure that everything is functioning correctly.
Installing the Planter
Careful consideration is needed to determine the best location and ensure a stable and secure installation when installing the planters.
Determining the Installation Location
Before installing the planters, determine the ideal location based on your plants’ sunlight requirements. Consider factors such as the amount of direct sunlight, shade, and wind exposure in the chosen area. By placing the planters in an area that best meets your plants’ needs, you can ensure their optimal growth and health.
Prepping the Installation Area
Prepare the installation area by ensuring it is level and free of debris or obstacles. If placing the planters on a deck or patio, consider using pot risers or saucers underneath to protect the surface from water damage.
Mounting or Placing the Planter
Depending on the size and weight of your planters, you may need to mount them or place them in the desired location. You can directly put smaller planters on the ground or a stable surface. Use a level to ensure that they are perfectly balanced.
For larger or heavier planters, mounting them to a wall, fence, or railing may be necessary. Follow the manufacturer’s instructions for the specific mounting hardware you are using to ensure a secure and stable installation. Always use appropriate screws, brackets, or hooks designed for outdoor use and capable of supporting the weight of the planter.
Maintenance and Care
Regular maintenance and care are essential to keep your wooden planters looking their best and ensure their longevity.
Cleaning the Planter
Regularly clean the surface of your planters to remove dirt, debris, and any potential mold or mildew buildup. Use a soft brush or cloth to gently scrub the wood, avoiding harsh abrasives that could damage the finish. Rinse the planters thoroughly with water and allow them to air dry before applying any finishes or treatments.
Reapplying Finishes
Over time, the finishes on your planters may begin to fade or wear off due to exposure to the elements. To maintain their appearance and protection, periodically reapply finishes according to the manufacturer’s recommendations. This will help to refresh the color, enhance the wood’s natural grain, and ensure that the planters remain well-protected.
Replacing Damaged Wood
If any wood in your planters becomes damaged, such as rotting or warping, it’s essential to address the issue promptly. Remove any affected boards and replace them with new ones to maintain the structural integrity of the planters. It’s best to catch and repair any damage early on to prevent further issues and ensure your planters remain sturdy and functional.
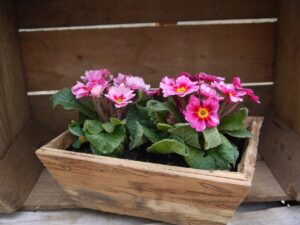
Customizing the Planter
To add a personal touch to your wooden planters, consider customizing them with personalized designs, paint, stains, or decorative hardware.
Adding Personalized Designs
Incorporate your creativity by adding personalized designs to your planters. You can carve designs or patterns into the wood, create stenciled patterns, or even apply decals or stickers. Customize the planters with your initials, a meaningful quote, or any other artwork that reflects your style and personality.
Painting or Staining the Planter
Painting or staining your planters can completely transform their look. Choose paints or stains that complement your outdoor space and the surrounding environment. Consider using multiple colors or blending different stains to create a unique and eye-catching finish.
Before applying paint or stain, make sure the wood is clean and dry. Sand any rough surfaces and apply a primer if necessary. Use a brush or roller to evenly apply the paint or stain, following the manufacturer’s instructions for drying times and recoating. Allow the finish to dry completely before handling or planting in the planters.
Using Decorative Hardware
Enhance the look of your wooden planters by adding decorative hardware such as corner brackets, handles, or hinges. These small details can elevate the overall aesthetic and give your planters a distinctive and stylish touch. Choose hardware that is weather-resistant and complements the design of your planters.
Alternative Materials for Planters
While wooden planters are a popular choice, various alternative materials are available that offer unique benefits and possibilities.
Exploring Non-Wood Options
If you prefer a different material for your planters or want to explore alternative options, consider metal, fiberglass, or plastic. Each material has advantages and may be better suited for specific needs or design preferences.
Metal planters, such as those made from stainless or corten steel, offer durability and a sleek, contemporary look. Fiberglass planters are lightweight, weather-resistant, and can be molded into various shapes and sizes. Plastic planters are affordable, ligand weight, and come in various sizes fits and Drawbacks of Alternative Materials
When considering alternative materials, weighing each option’s benefits and drawbacks is essential. Planters offer durability but may be more expensive and heavier than other materials. Fiberglass planters are lightweight and versatile but may have limited color options. Plastic planters are affordable and lightweight but may not have the same aesthetic appeal or durability as other materials.
When choosing an alternative material for your planters, consider your plants’ specific needs, the style of your outdoor space, and your personal preferences. Research the pros and cons of each material to ensure that it meets your requirements.
Building Planters with Alternative Materials
If you explore alternative materials for your planters, similar principles and techniques can be applied during construction. Measure and cut the materials to the desired size, assemble the components using appropriate fasteners and consider adding drainage holes or liners as necessary.
Follow the manufacturer’s instructions and recommended assembly, finishes, and maintenance methods to ensure that your planters remain functional and visually appealing.
In conclusion, building custom wooden planters is an enjoyable and rewarding project that allows you to add a personal touch to your outdoor space. By carefully selecting suitable wood, measuring and cutting with precision, assembling securely, and applying finishes, you can create beautiful and durable planters that will enhance the beauty of your garden or patio for years to come. Don’t forget to consider the importance of drainage, adding feet or casters for mobility, and properly installing the planters. With regular maintenance and care, your wooden planters will last and provide a charming home for your favorite plants. If you prefer alternative materials, explore their possibilities and find the best fit for your needs. Get creative, customize your planters, and enjoy the satisfaction of building something unique and functional for your outdoor space.