Are you itching to add a touch of greenery to your home but don’t have much space? Look no further! In this article, we will show you how to build your planter boxes effortlessly, allowing you to bring the beauty of nature into any corner of your living space. Whether you’re a seasoned DIY enthusiast or a beginner, these simple yet effective steps will guide you through creating stunning planter boxes that will transform your home into a vibrant oasis. So grab your tools, and let’s start this exciting journey of green-thumb creativity! Planter boxes are a fantastic addition to any garden or outdoor space. They provide a convenient and stylish way to display your favorite plants and flowers and allow you to customize your garden design fully. Whether you have a sprawling backyard or a small balcony, building your planter boxes can be rewarding and fulfilling. This comprehensive guide will walk you through building and caring for your planter boxes, from choosing suitable materials to troubleshooting and maintenance.
Choosing the Right Materials
Regarding planter box materials, there are several options: wood, plastic, and metal. Each material has its own unique advantages and considerations.
Wood
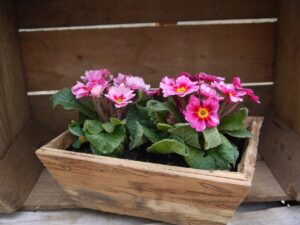
Wooden planter boxes are popular due to their natural and rustic appeal. They are also relatively easy to work with and can be customized in size, shape, and design. Cedar and redwood are excellent for wooden planter boxes as they naturally resist decay and insect infestation. Other types of wood, such as pine or oak, can also be used, but they may require treatment to improve durability and weather resistance. Additionally, wood can be stained or painted to add a splash of color or better match your existing outdoor decor.
Plastic
Plastic planter boxes are lightweight, durable, and often more affordable than their wooden counterparts. They are available in various colors and styles, allowing you to find the perfect match for your outdoor aesthetic. Plastic planters are also resistant to rot and weather damage, making them low-maintenance and long-lasting. However, remember that plastic is not as breathable as wood or other natural materials, so proper drainage is crucial to prevent waterlogged soil.
Metal
Metal planter boxes, such as those made from galvanized steel or aluminum, offer your outdoor space a sleek and contemporary look. They are sturdy, weather-resistant, and can withstand extreme temperatures. Metal planters are also less susceptible to rot, pests, and other forms of damage. However, metal can heat up quickly under direct sunlight, so consider choosing lighter colors or placing the planter boxes in partially shaded areas to prevent excessive heat buildup.
Measuring and Cutting the Wood
If you opt for wooden planter boxes, measuring and cutting the wood is essential to ensure that all the pieces fit together seamlessly. Before you start, gather the necessary tools and materials.
Gathering Tools and Materials
To measure and cut the wood, you will need a tape measure, a pencil or marker, a miter or circular saw, a carpenter’s square or straight edge, and clamps to secure the wood during cutting. Also, ensure you have the appropriate safety gear, such as safety glasses and gloves.
Measuring and Marking the Wood
Start by measuring and marking the dimensions for each piece of the planter box, including the base, sides, and corners. Use a tape measure to accurately measure the length and width, and mark the measurements on the wood using a pencil or marker. Remember to account for the thickness of the wood when making your measurements.
Cutting the Wood
With your measurements and markings in place, it’s time to cut the wood pieces to size. Secure the wood to your work surface using clamps for stability, and use a miter saw or circular saw to make straight and precise cuts along the marked lines. Take your time and ensure that each piece is cut to the correct length and angle, as this will affect the overall stability and appearance of the planter box.
Assembling the Planter Box
Once you have all the pieces cut to size, it’s time to assemble the planter box. Follow these steps to ensure a sturdy and well-constructed box.
Laying Out the Pieces
Before attaching the pieces, lay them on a flat surface to ensure everything lines up correctly. This will help you visualize how the planter box will look once assembled and make any necessary adjustments before attaching the pieces.
Attaching the Sides to the Base
To assemble the planter box, attach the sides to the base. Apply wood glue along the edges of the base piece, then position the side piece perpendicular to the base and press firmly to secure them together. Use clamps to hold the pieces in place while the glue dries, or use screws for added stability.
Attaching the Corners
To reinforce the structure of the planter box, attach corner brackets or braces at each of the four corners. These brackets or braces will add strength and prevent the sides from separating over time. Measure and mark the placement of the brackets, then screw them into the wood to secure them in place. Repeat this step for all four corners.
Adding Drainage Holes
Proper drainage is crucial for the health of your plants. Water can accumulate in the planter box without adequate drainage, leading to root rot and other issues. Here’s how to add drainage holes to your planter box.
Determining Hole Placement
Before drilling the drainage holes, determine the best placement. Ideally, you want to create several evenly-spaced holes along the bottom of the box. This will allow excess water to drain out while still retaining enough moisture for the plants to thrive.
Drilling the Drainage Holes
Carefully drill the drainage holes at the marked locations using a drill and a drill bit suitable for your chosen material. Take care not to drill too close to the edges or corners to prevent weakening the structure of the planter box. Once the holes are drilled, clean up any wood chips or debris to ensure a clean and tidy finish.
Optional Finishing Touches
To enhance your planter box’s overall appearance and durability, consider adding some optional finishing touches. These can include sanding the wood, applying wood stain or paint, and adding decorative details.
Sanding the Wood
Sanding the wood will smooth rough edges or surfaces and create a more pleasant texture. Use sandpaper or a sanding block to gently sand the entire planter box, paying extra attention to any noticeable imperfections. Start with a rougher grit sandpaper and gradually move to a finer grit for a polished finish.
Applying Wood Stain or Paint
Adding a coat of wood stain or paint can protect the wood from weather damage and give your planter box a personal touch. Choose a stain or paint color that complements your outdoor decor and apply it evenly with a brush or roller, following the manufacturer’s instructions. Allow the stain or paint to dry completely before moving on to the next step.
Adding Decorative Details
To make your planter box genuinely unique, consider adding some decorative details. This can include attaching trim or molding to the edges, adding decorative metal accents, or carving intricate designs into the wood. Let your creativity shine, and explore different ways to personalize your planter box.
Preparing for Planting
Now that your planter box is fully assembled and finished, it’s time to prepare it for planting. Start by lining the planter box to protect the wood and create a barrier between the soil and the wood.
Lining the Planter Box
To prevent the soil from directly contacting the wood, line the interior of the planter box with a layer of landscape fabric or plastic liner. This will help prevent the wood from rotting or deteriorating over time. Cut the liner to fit the dimensions of the planter box, and secure it in place using staples or adhesive.
Adding Soil and Fertilizer
Once the planter box is lined, adding soil and fertilizer is time. Choose a high-quality potting soil suitable for the types of plants you intend to grow. Fill the planter box with soil, leaving enough space at the top to accommodate the plants. Mix some organic fertilizer to provide essential nutrients for healthy plant growth if desired.
Choosing Plants
Choosing the right plants for your planter box is essential for their long-term success. Consider the sunlight and climate conditions of your outdoor space to ensure that you select plants that will thrive.
Consider Sunlight and Climate
Observe the amount of sunlight your outdoor space receives throughout the day. Is it mostly in full sun, partial shade, or full shade? Different plants have different sunlight requirements, so choose plants suitable for your specific conditions. Additionally, consider your area’s climate and select plants adapted to the temperature and weather patterns.
Selecting Suitable Plants
In addition to sunlight and climate considerations, consider the overall aesthetic you want to achieve with your planter box. Do you want lush green foliage, colorful flowers, or a mix of both? Choose plants that have similar water and light requirements to ensure that they will thrive together in the limited space of the planter box. Pay attention to the mature size of the plants as well to avoid overcrowding.
Planting and Caring for Your Plants
With your planter box prepared and plants selected, it’s time to start planting and caring for your plants. Follow these guidelines to ensure healthy and thriving plants.
Transplanting Seedlings or Small Plants
If you are starting with seedlings or small plants, carefully remove them from their containers, taking care not to damage the roots. Gently loosen the roots if they are tightly bound, and place the plants in the prepared soil, positioning them at the same level they were in their original containers. Firmly pack the soil around the plants, ensuring good root-to-soil contact.
Watering and Maintaining Proper Moisture Levels
Proper watering is vital for your plants’ health. Aim to keep the soil consistently moist but not overly saturated. Avoid letting the soil dry out completely, which can stress the plants. Regularly check the moisture level by inserting your finger into the soil. If it feels dry, it’s time to water. Consider using a drip irrigation system or self-watering planter if you anticipate being away for extended periods.
Regularly Pruning and Monitoring for Pests
Regularly prune your plants as needed to promote healthy growth and prevent overcrowding. Remove dead or damaged leaves, flowers, or stems to redirect the plant’s energy towards new growth and blooming. Watch for pests such as aphids or snails and take appropriate action to protect your plants from infestations. This may involve using organic pest controls or handpicking pests.
Positioning and Displaying Your Planter Boxes
Choosing the right location for your planter boxes is crucial to their success and aesthetic appeal. Consider these factors when deciding where to place your planter boxes.
Choosing the Right Location
Place your planter boxes in an area that receives the appropriate amount of sunlight for your chosen plants. Consider the overall design of your outdoor space and how the planter boxes will complement the existing features. Additionally, ensure that the planter boxes are easily accessible for maintenance and watering.
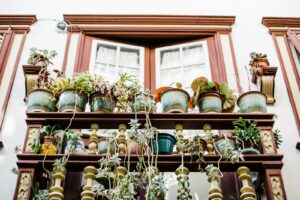
Using Multiple Planter Boxes for Aesthetic Appeal
Consider using multiple boxes in different sizes and arrangements to create visual interest and maximize the impact of your planter boxes. Similar materials, finishes, or color schemes can create a cohesive look. Experiment with other arrangements, such as lining them up along a wall, clustering them together, or staggering them at different heights.
Troubleshooting and Maintenance
Like any garden feature, planter boxes may require occasional troubleshooting and maintenance. Please familiarize yourself with these common issues and how to address them.
Addressing Drainage Issues
If you notice that your planter box is not draining correctly or water is accumulating at the bottom, promptly addressing the drainage issues is essential. Check the drainage holes to ensure they are not clogged with soil or debris. If necessary, enlarge the holes or add additional holes to improve drainage. You can also elevate the planter box by placing it on feet or bricks for better airflow.
Replacing or Repairing Damaged Parts
Over time, the wood or other materials used in your planter box may become damaged or worn. If you notice any signs of decay, rot, or structural instability, replacing or repairing the affected parts promptly is essential. This may involve replacing a single side or corner of the box or reinforcing weak areas with additional brackets or braces. Regularly inspect your planter box for any signs of damage and address them as soon as possible.
Regular Cleaning and Maintenance
Regular cleaning and maintenance are necessary to keep your planter boxes looking their best. Remove fallen leaves or debris from the planter box, as they can harbor pests or contribute to soil compaction. Additionally, periodically clean the exterior surfaces of the planter box using a mild detergent and water. Avoid harsh chemicals or abrasive cleaners, which can damage the finish or paint.
In conclusion, building your planter boxes is a rewarding and enjoyable project that allows you to flex your creativity and add a personal touch to your outdoor space. By choosing the suitable materials, measuring and cutting with precision, and assembling them carefully, you can create sturdy and beautiful planter boxes that will enhance the beauty of your garden. Consider drainage, add optional finishing touches, and prepare the planter boxes for planting. Choose suitable plants, properly care for them, and position the planter boxes strategically to create a visually appealing display. With troubleshooting and regular maintenance, your planter boxes will continue to be a source of joy and beauty in your outdoor space for years. Happy planting!