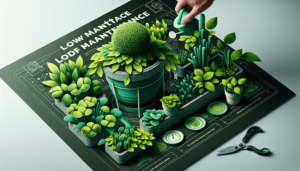
This comprehensive guide will explore the fascinating world of vegetative propagation techniques. From simple stem cuttings to more complex methods like grafting and layering, we will uncover the secrets behind successfully reproducing plants without seeds. Delve into the world of horticulture as we find the various techniques that can be employed to propagate plants. Whether you are a seasoned gardener or just starting, this guide will give you the knowledge and tools to expand your plant collection quickly. Get ready to unlock the secrets of vegetative propagation and watch your garden flourish like never before.
Cuttings
Introduction to Cuttings
Cuttings are one of the most common and popular methods of vegetative propagation. This technique involves taking a portion of a plant and encouraging it to develop roots so that it can grow into a new plant. Cuttings can be taken from various parts of a plant, such as stems, leaves, or even roots, depending on the type of plant and desired outcome.
Types of Cuttings
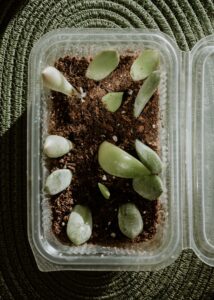
There are several types of cuttings, each suited to different plant species and specific goals. Stem cuttings involve taking a portion of a stem with leaves or nodes intact. As the name suggests, leaf cuttings use individual leaves to propagate new plants. Root cuttings are taken from the plant’s roots and can be used to create independent new plants. Additionally, softwood, hardwood, and semi-hardwood cuttings refer to the stage of growth of the parent plant when the cutting is taken.
Preparing the Cutting
Before cutting, it is essential to ensure that the parent plant is healthy and disease-free. Select a suitable stem or leaf and make a clean, diagonal cut below a node. Remove any lower leaves or buds present, as they can inhibit root development. Dip the cut end of the cutting in a rooting hormone to encourage the formation of roots. Finally, place the cutting in a well-draining potting mix or rooting medium, ensuring that at least one node is submerged.
Rooting the Cutting
Providing the cutting with the right conditions is essential to encourage successful root formation. Place the cutting in a warm, humid environment with indirect light. Mist the cutting regularly to maintain humidity and prevent dehydration. Ensure that the rooting medium remains moist but not soggy. After several weeks, roots should begin to develop, signaling that the cutting has successfully rooted. The cutting can be potted into its container, and appropriate care can be provided.
Aftercare for Rooted Cuttings
Once the cutting has rooted and established itself as a new plant, proper aftercare is crucial. Gradually acclimate the plant to its new environment by exposing it to increasing amounts of light and reducing humidity. Provide regular watering, taking care not to overwater or let the soil become too dry. Monitor the plant for any signs of pests or diseases and address them promptly. The rooted cutting will continue to grow and thrive with proper care and attention.
Layering
Introduction to Layering
Layering is another effective method of vegetative propagation that involves encouraging a stem or branch of a plant to root while still attached to the parent plant. This technique allows for producing multiple new plants from a single parent plant, making it particularly useful for plants that are difficult to propagate through other methods.
Types of Layering
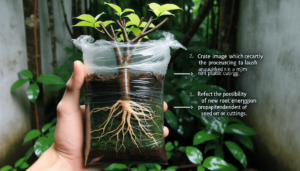
There are several different types of layering, each with its unique approach. Air layering involves wrapping a stem or branch in a moist medium and covering it with plastic wrap to encourage root formation. Simple layering is done by burying a low-growing stem directly into the soil while it is still attached to the parent plant. Compound or serpentine layering involves bending a long stem and burying sections of it at intervals to promote root growth. Finally, mound layering is used for plants with flexible stems by creating a mound of soil around the plant and burying parts of the stem to stimulate rooting.
Selecting a Suitable Stem
When selecting a stem for layering, choosing a healthy and flexible stem that is not too woody or tender is essential. The selected stem should have nodes or aerial roots present, as these are the points from which roots will develop. It is also important to choose a stem that is easily accessible and can be manipulated for layering without damaging the plant.
Methods of Layering
The method of layering depends on the type of layering being performed. For air layering, make a horizontal cut through the bark and cambium layer of the stem, ensuring that the cut is deep enough to expose the inner tissue. Dust the cut area with rooting hormone and wrap it with a moist moss or rooting medium. Secure the moss with plastic wrap and wait for roots to develop before separating the rooted layer from the parent plant. For simple layering, bury a portion of the stem in a shallow trench, keeping the growing tip above ground. Cover the buried portion with soil and provide regular watering. Once roots have developed, the layer can be separated and potted as an independent plant.
Aftercare for Layered Plants
After separation from the parent plant, layered plants require proper care to ensure their successful establishment. Transplant the new plant into a well-draining potting mix or garden soil, taking care not to disturb the newly formed roots. Provide regular watering and monitoring for pests or diseases. Gradually acclimate the plant to its new environment by exposing it to increasing light and reducing humidity. Layered plants will continue to grow and thrive in their new locations with appropriate aftercare.
Grafting
Introduction to Grafting
Grafting is a technique for combining two different plant varieties, creating a single plant that exhibits desirable traits from both. This method is commonly used in fruit tree propagation, allowing for the production of trees that bear multiple types of fruits. Grafting involves joining a scion, a piece of a desired plant, onto a rootstock, which provides the root system and support for the new plant.
Types of Grafting
There are several types of grafting, each suited to different plants and desired outcomes. Whip grafting involves making a diagonal cut on the scion and the rootstock and joining them together. Side or cleft grafting involves creating a vertical cut into the rootstock and inserting the scion into the aperture. In bud grafting, a bud from the desired plant is inserted into a cut on the rootstock. These are just a few examples of the many grafting techniques available.
Selecting Compatible Plants
To ensure grafting success, compatible plants must be selected. The scion and rootstock should be closely related and from the same or similar plant species. Additionally, the growth rates, vigor, and disease resistance of both the scion and rootstock must be considered to ensure a successful graft.
Preparing the Rootstock and Scion
Before grafting, it is necessary to prepare both the rootstock and scion. Make clean, diagonal cuts on the rootstock and scion, ensuring the stems or branches match up as closely as possible. A precise and clean cut is essential to ensure a tight and secure bond between the two pieces. Additionally, it may be helpful to treat the cut surfaces with a grafting compound or wax to protect them from drying out and infection.
Grafting Techniques
The specific technique used for grafting depends on the desired outcome and the type of plant being propagated. Once the rootstock and scion are prepared, they can be joined using the selected grafting technique. Secure the two pieces together using grafting tape or another suitable material. The graft should be wrapped tightly to ensure a secure bond, but care should be taken to avoid damaging the delicate tissue. After grafting, appropriate care and monitoring are provided to ensure the success of the graft.
Budding
Introduction to Budding
Budding is a technique similar to grafting, but instead of using a piece of stem or branch, a bud is inserted into the rootstock. This method allows for the propagation of complex plants to graft, as the success rate is often higher. Budding is commonly used for fruit trees, roses, and other ornamental plants.
Types of Budding
There are several types of budding, each suited to different plants and preferred techniques. T-budding involves making a T-shaped cut in the rootstock and inserting a bud from the desired plant into the flap created. Chip budding is done by making a small, rectangular cut in the rootstock and inserting a bud from the scion into the cut. Patch budding involves removing a small patch of bark from the rootstock and replacing it with a bud from the scion. These are just a few examples of the various budding techniques available.
Selecting Compatible Plants
Like grafting, selecting compatible plants is crucial for successful budding. The bud and rootstock should be closely related and from the same or similar plant species. Additionally, it is essential to consider both the bud and rootstock’s growth rates, vigor, and disease resistance to ensure successful budding.
Preparing the Bud
Before budding, the bud must be prepared for insertion into the rootstock. Make a clean, upward cut just below the bud, ensuring a small portion of the bark is included. The bud should be fully mature but not overly hardened to ensure successful growth and establishment.
Budding Techniques
The specific budding technique depends on the desired outcome and the type of plant being propagated. Once the bud and rootstock are prepared, the bud can be inserted into the rootstock using the selected budding technique. Secure the bud in place using budding tape or another suitable material, ensuring that it is tightly wrapped to maintain contact between the bud and rootstock. After budding, appropriate care and monitoring are provided to ensure the success of the bud.
Division
Introduction to Division
Division is a vegetative propagation method that divides a mature plant into multiple parts, each of which can develop into a new individual plant. This method is commonly used for perennial plants that naturally produce clumps or have a spreading growth habit. The division is an effective way to rejuvenate overcrowded plants and increase their overall health and vigor.
Types of Division
There are several types of division, each suited to different plant species and growth habits. Rhizome division involves separating and replanting the underground rhizomes, which are horizontal stems that produce roots and shoots. Clump division is performed by carefully separating the parent plant into multiple sections, ensuring each has its own set of roots. Offset division is similar to clump division, but it involves explicitly separating the offsets, which are small, self-sufficient plants that develop from the parent plant.
Preparing the Plant
Before division, it is essential to prepare the plant by ensuring that it is well-hydrated and healthy. Water the plant thoroughly a day or two before division to ensure the soil is moist but not saturated. This will make it easier to separate the roots and minimize stress on the plant. Additionally, inspect the plant for any signs of disease or pests and address them before proceeding with division.
Division Techniques
The specific technique used for division depends on the type of division being performed. For rhizome division, carefully dig up the plant and gently separate the individual rhizomes, ensuring each section has roots and shoots. Clump division involves carefully lifting the plant from the ground and dividing the clump into multiple sections, using a sharp knife or garden tool as necessary. Offset division is done by locating the offsets and gently detaching them from the parent plant, ensuring each offset has roots.
Aftercare for Divided Plants
After division, proper aftercare is essential to encourage the successful establishment of the newly divided plants. Transplant each division into a suitable location or container, ensuring the roots are covered with soil and the plant is well-supported. Water the divisions thoroughly and monitor their progress, regularly watering as necessary. Gradually reintroduce the plants to their desired light exposure and adjust watering and care as needed. With appropriate aftercare, divided plants will continue to grow and flourish.
Tissue Culture
Introduction to Tissue Culture
Tissue culture, or micropropagation, is a specialized technique for propagating plants under sterile conditions. This method involves taking small tissue samples, known as explants, from a donor plant and placing them in a nutrient-rich medium where they develop into new plants. Tissue culture allows for the rapid production of many identical plants. It is beneficial for rare or endangered species and for removing viruses from plants.
Plant Selection and Explant Preparation
The first step in tissue culture is to select a suitable donor plant and prepare the explants. Choose a healthy and disease-free plant that exhibits the desired traits for propagation. Carefully remove a small tissue sample, such as a leaf or stem, to minimize damage or contamination. It is essential to work under sterile conditions and use sterilized tools to prevent the introduction of microorganisms that could compromise the tissue culture process.
Sterilization and Media Preparation
To prevent contamination, both the explants and the culture medium must be sterilized. The explants are typically washed in a disinfectant solution, such as bleach or alcohol, to remove any surface contaminants. The culture medium, which is a nutrient-rich gel or liquid, is prepared using specific formulations suited to the needs of the plant species being propagated. The medium is sterilized by autoclaving or filter sterilization, ensuring no unwanted microorganisms are present.
Inoculation and Culture Initiation
Once the explants and culture medium are sterilized, the explants can be introduced to the medium in a process known as inoculation. Depending on the tissue culture being performed, the explants may need to be cut into smaller pieces or placed in specific orientations in the medium. After injection, the culture vessels are sealed and put in a controlled environment with suitable lighting, temperature, and humidity to encourage growth and development.
Plantlet Development and Acclimatization
Over time, the explants will multiply and develop into plantlets, which can then be transferred to soil or other rooting medium for acclimatization. The plantlets are carefully removed from the culture vessels and washed to remove any remaining culture medium. Gradually expose the plantlets to the outdoor environment, slowly reducing the humidity and increasing the light levels. Monitor the plantlets closely for any signs of stress or disease and provide appropriate care to ensure their successful establishment.
Suckering
Introduction to Suckering
Suckering is a natural vegetative propagation method some plants use to produce new shoots or stems from their roots. This method is commonly observed in certain shrubs, trees, and herbaceous plants. Suckering can be encouraged and managed to propagate new plants and control the growth and spread of existing plants.
Promoting Suckering
SSpecific techniques can be implemented to promote suckering depending on the plant species and desired outcome to promote suckering. Some plants naturally produce suckers, but others may require particular conditions to stimulate sucker growth. By pruning or cutting back the parent plant, the plant’s growth hormone level can be disrupted, leading to the production of suckers. Additionally, physical damage, such as root pruning or piercing, can induce sucker development.
Propagating through Suckers
To propagate new plants through suckering, it is essential to select and manage the desired suckers carefully. Identify healthy and vigorous suckers that are suitable for propagation. Use sharp pruning shears or a knife to cut the suckers away from the parent plant, ensuring that each sucker has its own set of roots. Immediately transplant the suckers into appropriate containers or planting holes, providing them with suitable soil, light, and moisture conditions.
Managing Suckers
It is essential to manage suckers properly to prevent them from overpowering the parent plant and becoming a nuisance. Regularly monitor the growth and spread of suckers, removing any unwanted or invasive suckers promptly. This can be done by cutting or pulling the sucker away from the parent plant. Additionally, providing adequate spacing between plants and using physical barriers, such as root barriers or mowing strips, can help manage the spread of suckers.
Rhizomes and Tubers
Introduction to Rhizomes and Tubers
Rhizomes and tubers are specialized underground stems that certain plants use for storage and propagation. Rhizomes are horizontally growing stems that produce roots and shoots at various intervals, while tubers are swollen, fleshy structures that store nutrients and energy. Both rhizomes and tubers can propagate new plants and are commonly observed in plants such as iris, ginger, and potatoes.
Collecting and Preparing Rhizomes and Tubers
To collect rhizomes and tubers for propagation, carefully dig around the base of the parent plant and locate the underground stems or tuberous structures. Gently remove the rhizomes or tubers, not damaging them or breaking off any shoots or roots. After collection, cleaning and trimming the rhizomes or tubers, as well as removing any excess soil or dead tissue, may be beneficial.
Planting and Propagation Techniques
To propagate new plants from rhizomes or tubers, optimal growing conditions are essential. Plant the rhizomes or tubers for the specific plant species at the appropriate depth and spacing. Cover them with well-draining soil or a suitable planting medium, ensuring the bud or growing tip is upward. Provide regular watering and monitor for any signs of disease or pests. As the rhizomes or tubers develop, shoots and roots will emerge, resulting in the growth of new plants.
Aftercare for Rhizomes and Tubers
Proper care and aftercare after planting are crucial to ensuring the successful establishment of new plants. Regularly water the newly planted rhizomes or tubers, ensuring the soil remains moist but not soggy. Gradually expose the developing plants to increasing light to promote proper growth. Monitor for any signs of pests or diseases and take appropriate action to prevent or treat them. With adequate care and attention, new plants will thrive and grow from the propagated rhizomes or tubers.
Offsets
Introduction to Offsets
Offsets are small, self-sufficient plants that develop from the base of the parent plant. This natural propagation method is commonly observed in agaves, succulents, and grasses. Offsets can be detached from the parent plant and planted independently, resulting in the growth of new individual plants.
Identifying Suitable Plants
It is essential to identify suitable parent plants that produce offsets to propagate plants using offsets. Observe the base of the plant where offsets typically develop. Look for healthy and well-developed offsets with their own roots and shoots. Not all plants produce offsets, so choosing appropriate species or varieties conducive to this propagation method is crucial.
Collecting and Preparing Offsets
Carefully dig around the base of the parent plant to expose the offsets’ roots and gently detach them from the parent plant. Preserve as much of the offset’s root system as possible, not damaging the roots or shoots. Once detached, cleaning and trimming the offsets, as well as removing any excess soil or dead tissue, may be beneficial.
Propagating through Offsets
To propagate new plants through offsets, transplant each offset into its container or garden bed. Please make a small hole or depression in the planting medium and place the offset into it, ensuring the roots make good contact with the soil. Firmly pack the soil around the offset and water thoroughly. Provide appropriate lighting and moisture conditions for the specific plant species. Over time, the offsets will establish themselves and grow into independent plants.
Aftercare for Offset Plants
After transplantation, proper care is essential to ensure the successful establishment of the new plants. Regularly monitor the moisture level of the planting medium and water as necessary. Gradually introduce the offset plants to increasing light to promote proper growth. Monitor for any signs of pests or diseases and take appropriate action to prevent or treat them. With proper care, the offset plants will continue to develop and thrive.
Bulbs
Introduction to Bulbs
Bulbs are specialized underground structures that store nutrients and energy, enabling certain plants to survive adverse conditions and propagate through vegetative means. Common examples of bulbous plants include tulips, daffodils, and onions. Bulbs can propagate new plants by dividing and replanting them, allowing for the production of multiple identical individuals.
Selecting and Preparing Bulbs
Selecting healthy and mature bulbs to propagate plants using bulbs is essential. Choose bulbs that are free from visible damage or disease and are of adequate size for the specific plant species. Once selected, cleaning and trimming the bulbs may be beneficial, as well as removing excess soil or dead tissue.
Planting and Propagation Techniques
To propagate new plants from bulbs, plant them at the appropriate depth and spacing for the specific plant species. Ensure that the pointed end of the bulb faces upward and that the basal plate, which is the flat, root-bearing surface, is in direct contact with the soil. Cover the bulbs with well-draining soil, leaving only the top portion exposed. Provide regular watering and monitor for any signs of disease or pests. Over time, the bulbs will develop roots and shoots, resulting in the growth of new plants.
Aftercare for Bulbs
Proper care and aftercare are crucial to ensuring the successful establishment of new plants after planting. Regularly water the newly planted bulbs, providing the soil remains moist but not soggy. Gradually expose the developing plants to increasing light to promote proper growth. Monitor for any signs of pests or diseases and take appropriate action to prevent or treat them. With proper care and attention, new plants will thrive and grow from the propagated bulbs.
In conclusion, vegetative propagation is a versatile and effective method of reproducing plants. Numerous techniques are available to propagate plants, from cuttings, layering, grafting, and budding to division, tissue culture, suckering, rhizomes and tubers, offsets, and bulbs. Each method has unique requirements and advantages, allowing gardeners and horticulturists to propagate plants to suit their needs. By understanding these various techniques and providing appropriate care and aftercare, one can successfully propagate and cultivate multiple plant species.